-
Getting the latest version of Blendigo
The Indigo installer comes bundled with the latest version of Blendigo, however it can also be downloaded stand-alone from our Blender sub-forum, where it will be near the top of the top of the listed topics.
If you choose to use the stand-alone Blendigo installer, please note that you will still need to have the latest version of Indigo installed. For this reason we suggest using the Indigo installer to install Blendigo.
-
Ensuring the correct version of Blender is installed
Upon running the Blendigo installer, either from the main Indigo installer or the stand-alone installer, it will report the required version of Blender in the title, for example "Blendigo 3.6.25 for Blender 2.69".
If this version is not installed, install the appropriate version of Blender from http://www.blender.org before continuing.
-
Completing the installation
After you've verified that you have the appropriate version of Blender installed, allow the Indigo or Blendigo stand-alone installers to complete. If you're using the Indigo installer, ensure that the Blender exporter option was selected and installed.
As mentioned above, you must have Indigo installed in addition to the Blendigo exporter in order to render with Indigo from Blender. More detailed instruction for installing Indigo can be found here.
If the installer reports that it cannot find Blender on your system, either point it to your custom installation location, or follow the instructions from Step 1 again and ensure you install to the default locations. If you encounter further issues, please email us at support@indigorender.com.
-
Configuring Blender to use the Blendigo add-on
Open Blender, and from the File menu select "User Preferences". We want to enable the Blendigo add-on, so we select the "Render" filter from the list on the left near the bottom. Click the checkbox next to the "Render: Blendigo" option; it should become highlighted.
The dialog should look similar to this:
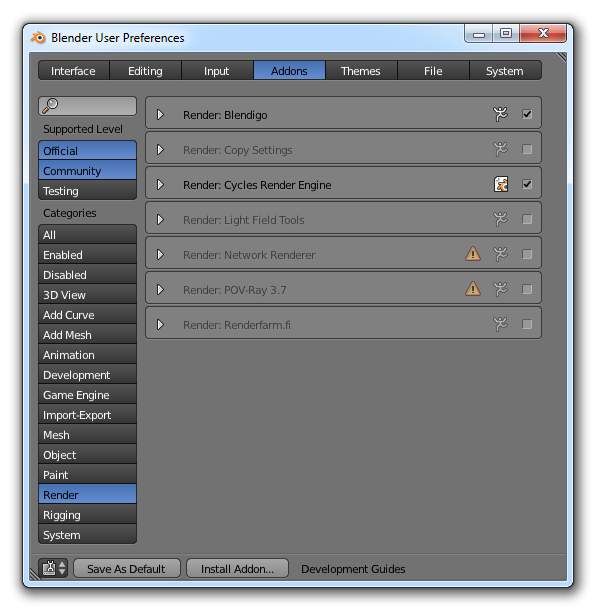
Click "Save As Default" so you won't have to do this every time you'd like to use Indigo as a renderer for Blender.
-
Setting the correct path to Indigo installation
You will need to make sure that the correct path to the Indigo executable is set in Blendigo:
You can find it here (Make sure Indigo is selected as the current render engine first - see next section)

On Windows, the path should be to the directory that the Indigo executable is in.
On OS X, the path should end with "Indigo.app", not "Indigo.app/Contents/MacOS/".
-
Exporting a simple test scene
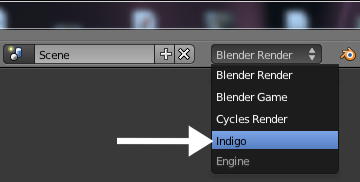
First we must set the current renderer to "Indigo" from the drop-down box at the top of the Blender window (the default being "Blender Render"):
If no lights are present in the scene, as is the case by default, then Blendigo will automatically add a Sun lamp to the scene.
Press F12 to initiate the export and render process, launching Indigo.
