Indigo for Cinema 4D
This manual is for Indigo for Cinema 4D 3.2.10 or later.

The Cosmonaut by aleksandera
Installation
This sections describes how to Install Indigo for Cinema 4D on your Computer.
Installing Indigo for C4D on Windows
This tutorial will cover getting Indigo running with Indigo for Cinema 4D on your computer.
This tutorial is for Windows users.
If you have not purchased an Indigo licence, you can still follow this tutorial. Indigo will run in trial mode, which will apply some watermarks to Indigo renders.
Step 1: Check your version of Cinema 4D
Indigo for Cinema 4D is compatible with 64-bit versions of releases 12 to 23 of Cinema 4D.
Step 2: Download Indigo
From the page http://www.indigorenderer.com/download-indigo-renderer, download the latest version of Indigo for Windows.
Step 3: Install Indigo
Once you have downloaded the Indigo installer program in Step 2, run the installer program.
If the installer asks you "Do you want to allow the following program to make changes to this computer", select "Yes".
Then accept the licence agreement.
On the 'Choose components' page, select select the C4D Exporter, and press "Next".
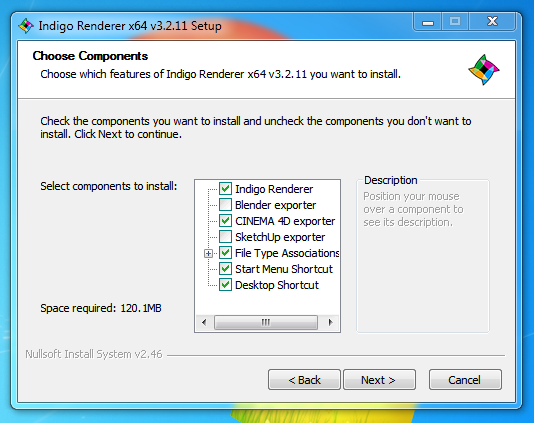
On the "Choose Install location" page, leave the Destination Folder as it is, and press "Install".
Step 4: Install Indigo for Cinema 4D
An installer will launch where you can select the C4D versions you want to install Indigo for C4D for on the "Choose components" page.
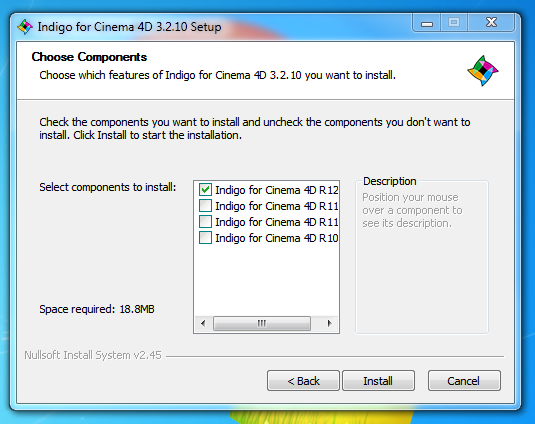
After selecting, press "Next".
For every selected version, another installer will launch.
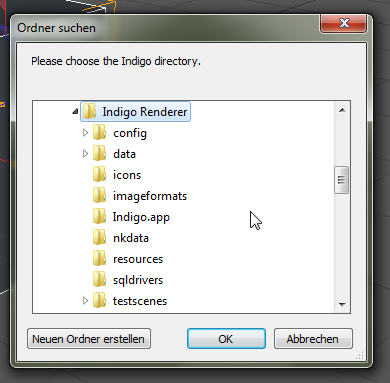
The installers will try to automatically detect your C4D installation directory. If the directory could not be automatically detected, set it to the main C4D directory.

Step 5: Locate Indigo Plugin menu
Once installed you can find Indigo for Cinema 4D in the "Plugins" menu inside Cinema 4D:

Installing Indigo for C4D on Mac OS X
This tutorial will cover getting Indigo running with Indigo for Cinema 4D on your computer.
This tutorial is for Mac OS X users.
If you have not purchased an Indigo licence, you can still follow this tutorial. Indigo will run in trial mode, which will apply some watermarks to Indigo renders.
-
Check your version of Cinema 4D
The Mac version of Indigo for Cinema 4D is compatible with C4D releases 12 to 19. There are both 32 and 64-bit versions of Indigo for Cinema 4D available.
-
Download and install Indigo
Download Indigo for your system and install it to the default location. Instructions for doing this are in the Indigo Manual. You can download Indigo from:
http://www.indigorenderer.com/download/ -
Download and install Indigo for Cinema 4D
Download the version of Indigo for Cinema 4D for your system from:
http://www.indigorenderer.com/cinema4dExtract the downloaded archive to you Cinema 4D's "plugin" folder, for example:
/Applications/MAXON/Cinema 4D/plugins
After extracting, your folder structure should look like this (an 'Indigo for Cinema 4D' folder inside the plugins folder, that contains all the Indigo for Cinema 4D files and folders):

If you have any issues installing Indigo for Cinema 4D, please email us at support@indigorender.com
-
Restart Cinema 4D
After installing Indigo for Cinema 4D should become available under the Plugins menu.
The Indigo for Cinema 4D plugins menu.
You are now ready to use Indigo for Cinema 4D.
Selecting Indigo for rendering externally
This section is about how to select the Indigo installation to use for rendering externally with Indigo Renderer or Indigo RT.
Automatic detection of Indigo installation on Windows
On Windows the Indigo installation directory should be automatically detected.
If the installation directory can not be detected Indigo for C4D will show a dialog on export asking to specify the location of indigo.exe.
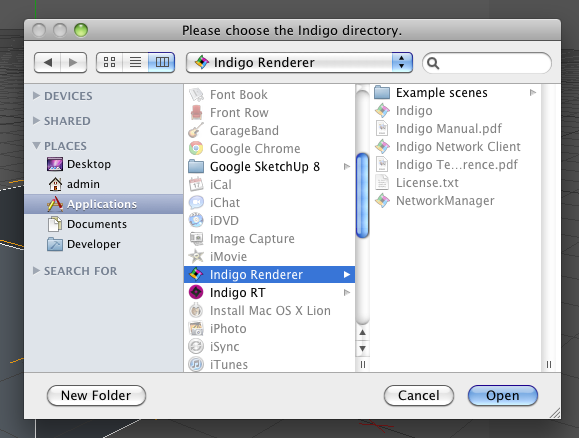
Selecting the Indigo installation on OS X
On OS X the installation directory can not be automatically detected. When starting the first export process, a dialog will show up asking to select the directory the Indigo.app is located in.
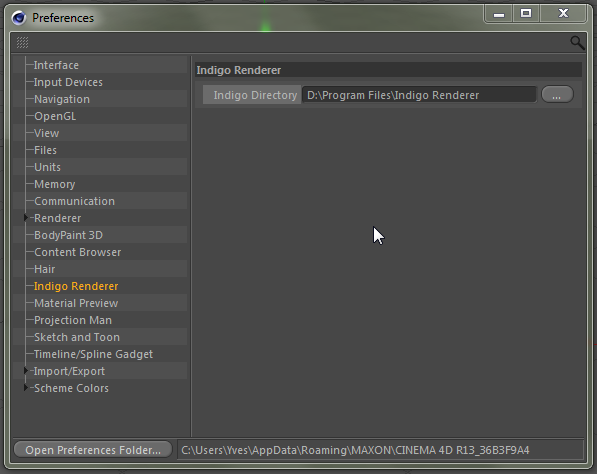
Selecting Indigo installation in Presets in C4D R12 and newer
This part applies to Indigo for C4D 3.4.8 and newer only.
In C4D R12 an newer there is a Indigo Renderer page in the Presets window where the path to the Indigo installation can be changed.
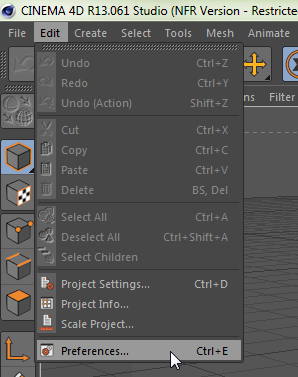
The presets can be accessed from the main menu under "Edit" -> "Preferences" (or with the shortcut CTRL + E).
On windows this path will default to the automatically detected Indigo installation directory.
Interface
Indigo for Cinema 4D Tags
There are several special tags you can add to you Cinema 4D objects. These tags extend the functionality of certain Cinema 4D objects to include Indigo-specific functions. See the Indigo manual for more information.
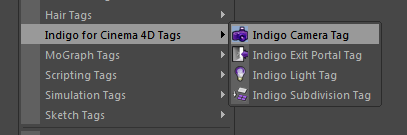
Indigo for Cinema 4D Tags
You can access this menu via: Object Manager menu > Tags > Indigo for Cinema 4D
Indigo Camera Tag
Add this to a Cinema 4D camera object to set Indigo specific settings. Use in conjunction with the Cinema4D's camera settings such as focal length and aperture.
See Camera
Indigo Exit Portal Tag
Adding this tag to an object makes this object export as an exit portal. The normals of the object should be pointing in the direction you want the light to enter the room.
Objects with this tag will only be exported as an exit portal and any materials on it will be ignored.
See Exit Portals
Indigo Light Tag
Add this tag to the lights Omni lights, Area lights, or Spot lights to set Indigo specific light options. The options are the same as adding emissions to a material. Because there are no point lights in Indigo, on export these special Cinema4D entities are translated into a mesh and act exactly as if you made a light bulb mesh and applied an emitting material to it.
See Emission, Base Emission
Indigo Subdivision Tag
See Subdivision
Material Settings
Here you can edit the attributes of an Indigo material. It can be found by selecting an Indigo material and looking in the Attribute Manager, or double-clicking on the Indigo material.
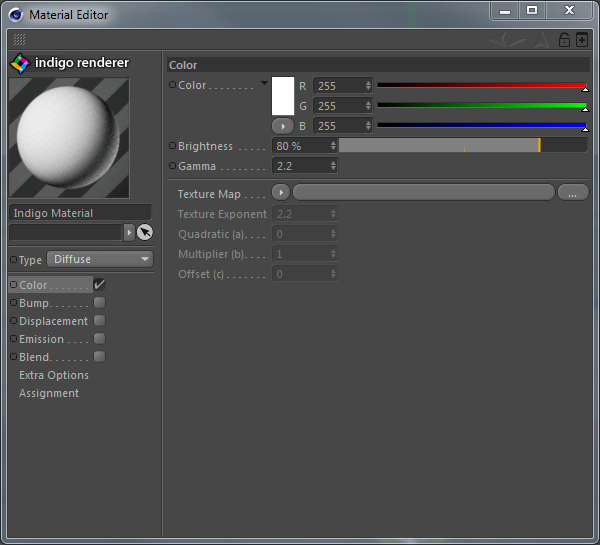
To create a new Indigo material, navigate Material Manager > File > New Indigo Material.
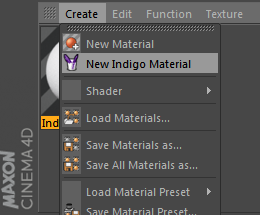
Create new Indigo material
Material Types
See Material Types
Material Channels and Attributes
Extra Options
| Texture Preview Size | This changes the quality of the texture in the Cinema4D view-port, it does not affect the rendered scene at all. |
| Shader Baking resolution: | The resolution to bake a shader at on export. |
| Export Material | Export the material to be used externally. |
| Assignment | Any objects that have this material applied are listed here. |
Plugins Menu
The Plugins Menu is mainly used to create Indigo objects, convert materials and start rendering.
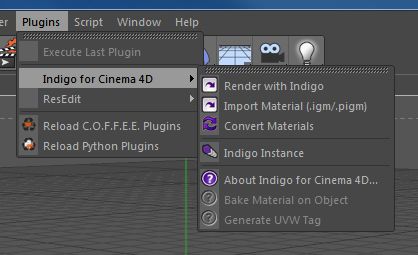
Indigo for Cinema 4D Plugins Menu
Render with Indigo
This exports the current scene to be rendered with Indigo. This works identically to the Cinema 4D command, except it exports using Indigo materials and launches Indigo to render the scene.
Import Material .igm/.pigm
This loads an .igm (Indigo Material) or .pigm (Packed Indigo Material) file from your computer and adds it to your scene so it can be applied to an object.
Convert Materials
This will load all of the Cinema 4D materials and convert them automatically to Indigo materials. Indigo for Cinema 4D will convert all C4D materials automatically on export to Indigo, however using this function will give you more control over the material settings.
Indigo Instance
Creates an instance that can be used to make multiple copies of an object in a memory-efficient and CPU-efficient way. Indigo instances are faster to render than Cinema 4D instances (which aren't real instances but are copies).
Bake Material on Object
Indigo for Cinema 4D bakes all C4D shaders to textures on export, but this feature allows you to bake unique 3D shaders to an objects UV map. It works similar to C4Ds "bake on object" command. A decent UV map is required. To use this function follow these steps:
Select the texture tag of a polygon object that has an Indigo material applied. Click Plugins > Indigo for Cinema 4D > Bake Material on Object.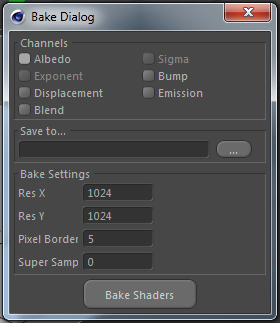
Bake Material on Object dialog box
Select the channels you want to bake and specify an output path. Pixel Border adds a blank border to the output texture file. Super Sample is an anti-aliasing technique.
Generate UVW Tag
C4D does not fully support UVW map generation for custom materials. This Indigo for Cinema 4D function allows you to bypass this limitation. Just select a texture tag with an Indigo material applied and click Plugins > Indigo for Cinema 4D > Generate UVW Tag.
Render Settings
The Indigo Render Settings let you control various aspects of how Indigo will render the scene.

Indigo for Cinema 4D Render settings
Most of the settings used for your renders will be copied directly from the existing Cinema 4D render settings, e.g. width and height come from the Output section of the Render Settings dialogue. However, there are some Indigo specific render settings that can be accessed via:
R10 and R10.5: Render menu > Render settings > Effect... > Indigo Render.
R11 - R12: Render menu > Render settings > General > Set the Render Enigne to 'Indigo Renderer'.
R13: Select 'Indigo Renderer' from the 'Renderer' drop-down in the top left of the Render Settings window.
Note that you need to press the “Effect...” button on the Render Settings window to access the advanced Indigo Settings. You do not need any other render pass, Indigo does it all.
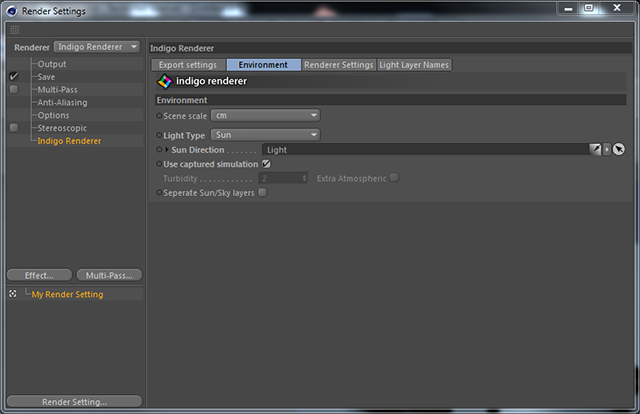
Export Settings
Environment
Render Settings
See Indigo Render Settings, Render Mode
Light Layer Names
See Light Layers
Tutorials
Getting started tutorial
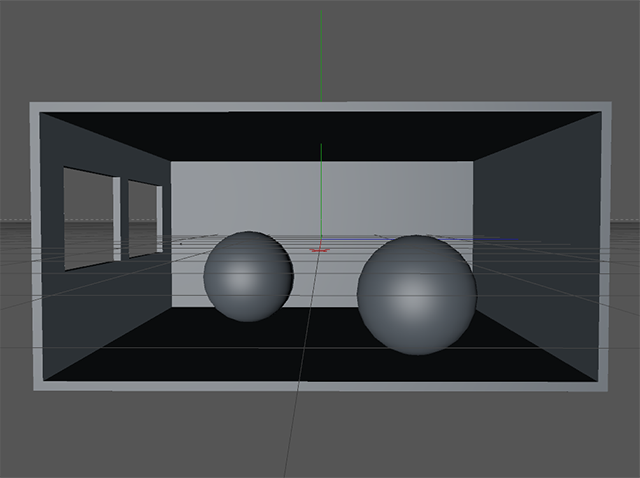
This is a quick tutorial to get you familiar with Indigo for Cinema 4D. A basic understanding of Cinema4D is required. The tutorial file is included with the download.
-
After installing Indigo and Indigo for Cinema 4D, open up Cinema 4D and construct a simple scene. This scene has two windows for light to shine in, and two spheres to test materials on.
-
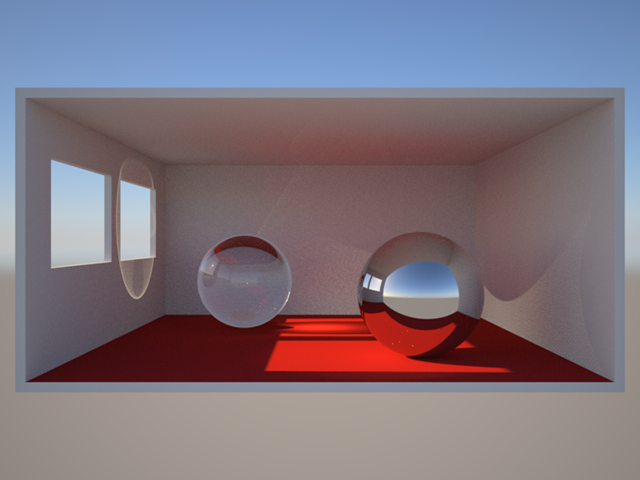
To render the scene with Indigo, select Plugins > Indigo for Cinema 4D > Render with Indigo from the menu, which will start the standalone Indigo application. Notice it is very plain and noisy, there is no need to render it for more than a few seconds as you can see right away that it needs work.
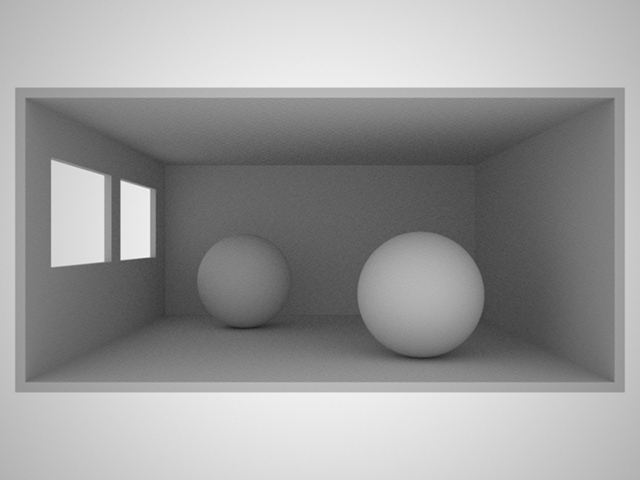
Quick render with Indigo
-
First, we will light it with the sun and sky model, which is the easiest and quickest way to add light. Add a C4D Infinite Light and point it in the direction that you want the sun to face. The Z axis (blue) defines the direction of the sun light.
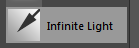
The sun will come in through the window
-
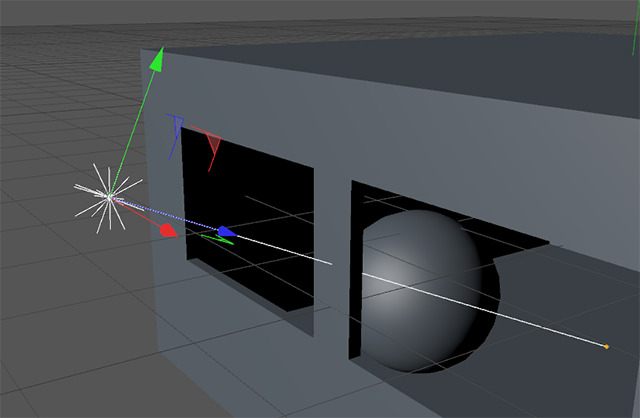
Open up the Render Settings, and set Indigo as the renderer. If you are using C4D R10 or R10.5, you will need to add Indigo as a Post Effect.
R10:
R11 - R12: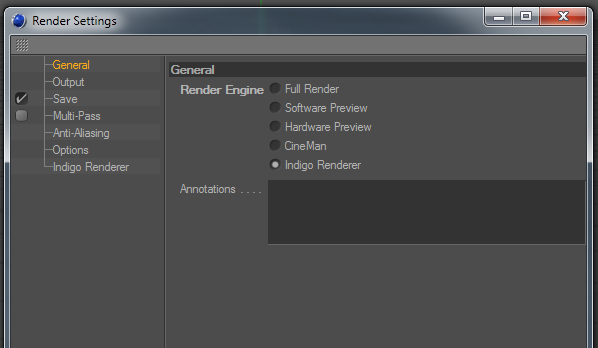
-
Go to the Environment tab and click-and-drag your Infinite Light tag into the Sun Direction. Turn on the 'Use captured simulation' to use Indigo's pre-computed sky data.
-
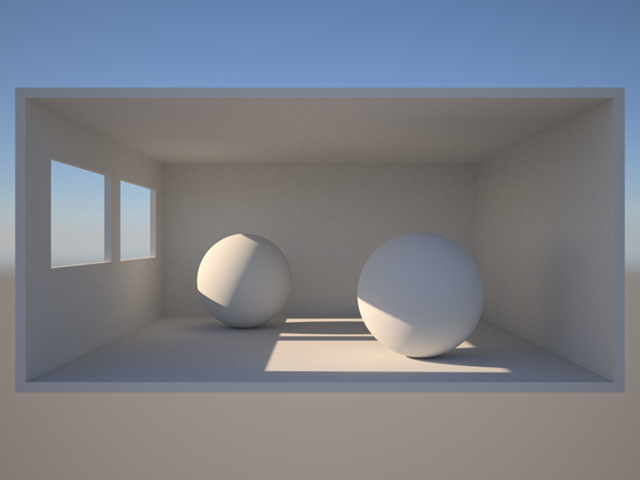
Render again to see the effect of the sun light on the scene.
-
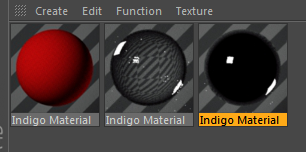
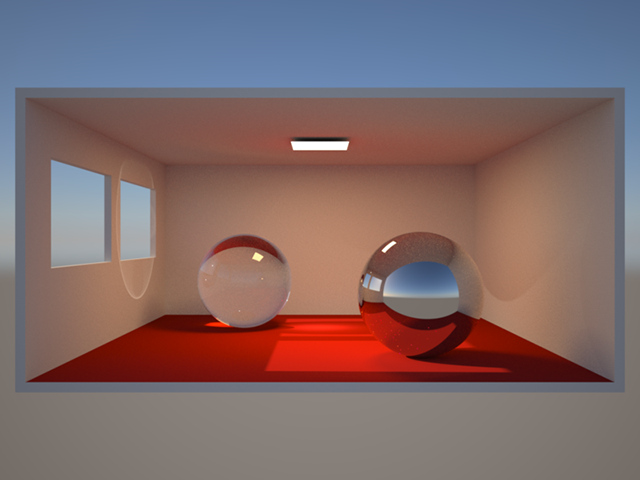
Now to add some materials to the scene. To Add a new material click: Material Manager > File > New Indigo Material. Change the material type to 'Phong' and increase the 'Exponent' to 100,000. Under the 'Phong' settings, turn on 'Use Specular Reflectivity'. Drag the new material on to the two spheres.
For the floor, we will make a material of type 'Diffuse' with the 'Color' (albedo), set to red.
-
Another render shows what the materials look like.
-
Last, we will add a light source for some interior lighting. Create an area light and apply a 'Indigo Light Tag' (right click on the light, Indigo for Cinema 4D > Indigo Light Tag). In the Light Tag, set the 'Light Spectrum Type' to 'Blackbody', change the 'Temperature' to 3500K and lower the 'Gain' to 0.005. If the light is too bright, the Reinhard tone mapping will compensate for it and make the sun & sky darker, which is why the gain has been set to 0.005.
Tutorial Files
Section planes tutorial
Please note that section planes are not supported in Indigo RT.
This is a short tutorial explaining the use of section planes with Indigo for C4D.
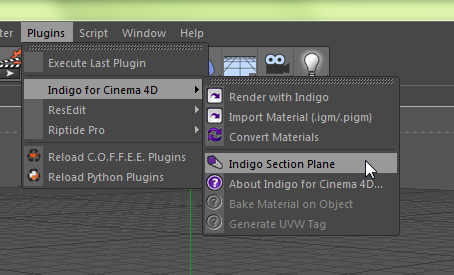
1. Add a section plane object to your scene. It can be found under "Plugins" -> "Indigo for Cinema 4D" -> "Indigo Section Plane".
2. Move and rotate the section plane object in a way you would like it to cut your scene. The section plane will currently cut the whole scene. Everything in the opposite direction of the Z axis (blue) will be cut.
You can have as many section plane objects in your scene as you like.

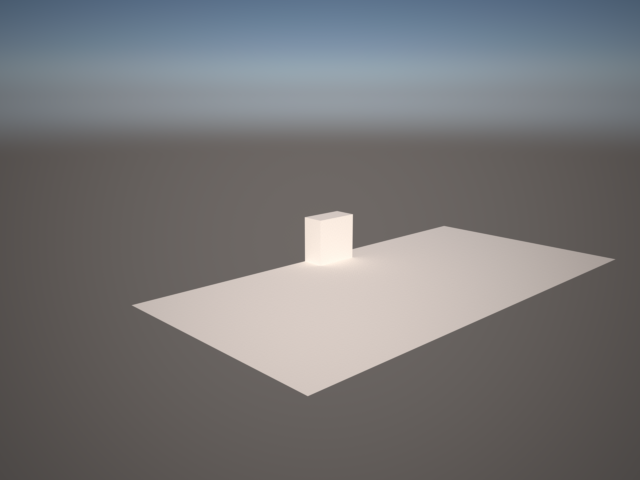
3. Render the scene. If everything worked you should see a result like this:
Tutorial Files
Orthographic camera tutorial
Please note that orthographic cameras are not supported in Indigo RT.
This is a short tutorial explaining how to use Indigo's orthographic camera feature in Indigo for C4D.
1. If not already present, add a C4D Camera object to your scene.
2. Select the camera and change the projection type in its properties to "parallel".
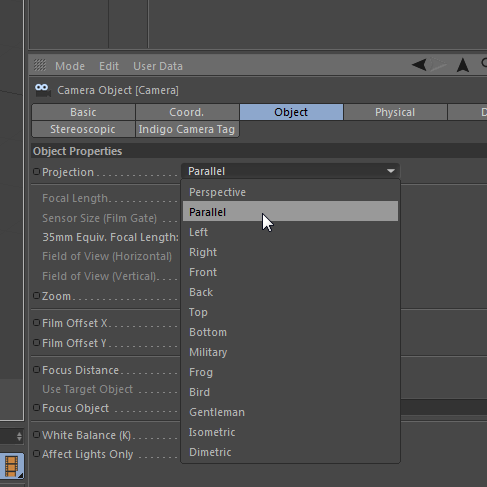
3. Set the camera as active camera and render the scene. If everything worked you should now be using Indigo's orthographic camera.

Tutorial Files
Example Scenes
Here you can find a few example scenes illustrating how to use Indigo for Cinema 4D.
The file contains scene files showing:
- Depth of field
- Exit portals
- Index of refraction
- Materials
- Sub-surface scattering
- Sun and Sky
![]() Download the example scenes. (up to C4D R18)
Download the example scenes. (up to C4D R18)
![]() Download the example scenes. (R19 and up)
Download the example scenes. (R19 and up)