Network Rendering
Indigo has built-in support for network rendering, which allows all the computers on a network to work together to render a single Indigo scene more rapidly.
You will need one master computer, that will coordinate the rendering process. Please note that it is not possible to start or coordinate the rendering process from a slave computer (registered with a node licence).
You will also need one or more slave computers, that will be helping to render the scene. For the purposes of this tutorial, the slave computers must be on the same local area network (LAN), and able to communicate with each other.
On the Master computer
- Launch the Indigo application.
- Open the scene that you want to render in the Indigo Renderer GUI using the "Open Scene" button.
- Press the "Network Rendering" button to enable network rendering mode.
- Press the start render button.
On the Slave computer
- Run the Indigo Network Render Slave.
The network slave can be launched by the shortcut (Windows), the Indigo Networks Slave app (OSX), or by running indigo or indigo_console executables with the command line switch "-n s":./indigo -n s
If the network slave can find the master and connect to it on the network, it will then download the scene from the master and start rendering it.
Viewing connected slaves on the master GUI
You can view all network slaves that are helping with the current render by selecting "Network Rendering" from the combo box on the right hand edge of the Master GUI.
Automatic Slave
Indigo for Windows has the ability to install itself as a system service, which enables your computer to run a Network Slave during screensaver. This is useful for utilising idle office workstations to accelerate network renders.
To enable the Windows service, navigate to your Indigo installation directory and run the "network_client_service_manager.exe" application, and click the "Install Service" button.

Uninstalling the service can also be done from this dialog, by clicking the "Uninstall Service" button.
Once the service is installed, when the computer goes into screensaver mode, it will start an Indigo Slave and contribute to any active network renders. When the computer exits the screensaver, the rendering is halted to free up the computer for use.
Network Manager
The Network Manager does two things:
-
Floating Licences
If you have purchased floating Indigo licences, the Network Manager hands out floating licences to computers on your network. However, you don't require floating licences to use the Network Manager for network rendering coordination.
To purchase Indigo floating licences, email us at sales@indigorenderer.com
-
Managing Network Rendering
Indigo supports network rendering, which means that additional computers (slaves) can help other computers (masters) render an Indigo scene.
The Network Manager can control and coordinate this network rendering, by assigning slaves to masters. This is ideal for an office or render farm situation where there are multiple masters and multiple slaves on the same network.
Network Rendering Tutorial
This tutorial will cover network rendering with the Indigo Network Manager.
Set up the network manager
-
Choose the manager computer
Choose a computer to run the network manager on. Ideally this computer would be running at all times, essentially acting as a server; we will call this computer the "Manager computer".
-
Install Indigo on the Manager computer
Install Indigo on the Manager computer. For detailed information about this step please see the Installing Indigo section.
-
Obtain the Manager computer's hostname
A hostname is a name used to identify a device connected to a computer network. To find the hostname of the Manager computer:
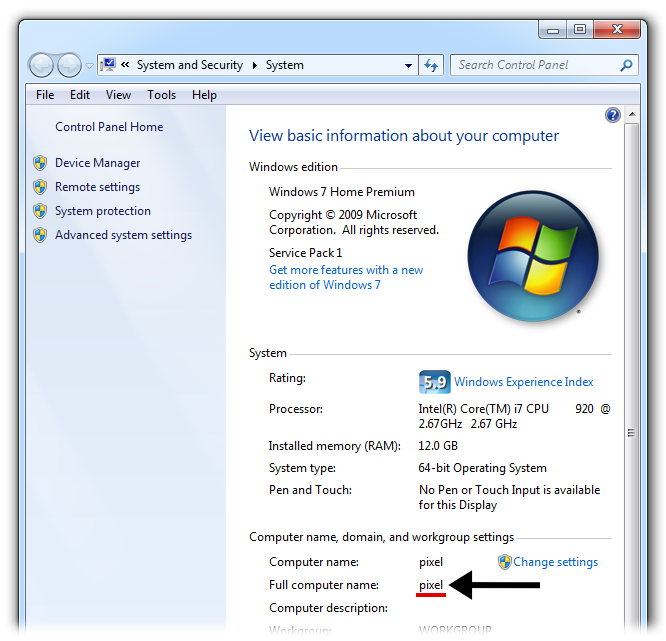
On Windows: From the Start menu, right click on "Computer" and select "Properties". The hostname is listed as the "Full computer name", which is "pixel" in this example:
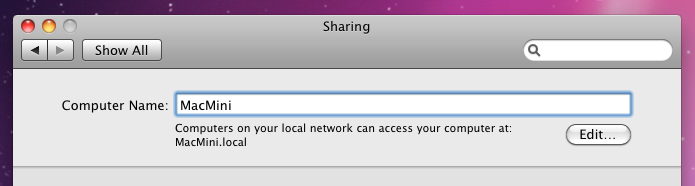
On Mac: The hostname is listed as "Computer Name" under System Properties → Sharing:
-
Run the network manager
Run the Network Manager on the manager computer. If the operating system prompts for permission to allow incoming connections, answer "Yes". Without this permission, other nodes will not be able to communicate with the Manager computer.
On Windows: Start → All Programs → Indigo Renderer → Indigo Network Manager
On Mac: Finder → Applications → Indigo.app → Indigo Network Manager -
Running a slave
On another computer that has Indigo installed:
- Start Indigo and click on the "Options" button.
- In the Network tab, make sure the "Use network manager" option is checked.
- In the "Network manager hostname" field, enter the Manager computer hostname.
- Ensure that the "Do master search broadcast" option is unchecked.
- Click "OK" to save the changes and exit the options dialog.
- From the tools menu, select "Start Network Slave".
Leave the network slave running for now.
-
Running the master
On the computer that you wish to use as the master computer, e.g. the computer that you will be starting a render from, start Indigo:
Start → All Programs →Indigo Renderer → Indigo Renderer- Click on the "Options" button.
- Ensure that the "Use network manager" option is checked.
- In the "Network manager hostname" field, enter the Manager computer hostname.
- Ensure that the "Do master search broadcast" option is unchecked.
- Click "OK" to save the changes and exit the options dialog.
Warning: When setting up the master, using "localhost" or "127.0.0.1" as the hostname for the network manager will prevent other slaves from connecting to the master.
This is due to to the fact that the master will then connect to the network manager through the loopback interface and the network manager will pass the IP from which the master connected on to the slaves. For loopback, this is always 127.0.0.1. -
Start the render
On the master computer, open a scene in Indigo that you wish to render, and press the "Render" button.
Now click the "Network Rendering" button to enable network rendering.
Verifying network rendering is working from the Master
On the Master computer, select "Network Rendering" from the drop down box in the Render Settings view.
If the network rendering configuration is correctly set up, there should be a client listed (with IP address and the hostname) in the "Connected slaves" list:
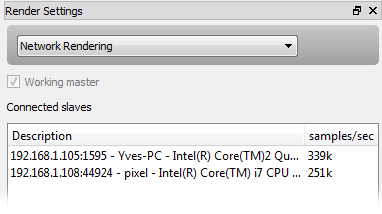
It will also show the rendering speed in samples per second for each slave. Note that this speed is not known until the first frame is transferred from the slave to the master, and so will show "Unknown" initially.
Verifying network rendering is working from the Network Manager
The Network Manager should show one slave in the "Slaves" list, and one master in the "Masters" list.
Additionally, the "Assigned master ID" for the slave should be the ID of the master. This means that the Network Manager has assigned the slave to the master.