Getting Started
To render with Indigo you'll need to install the actual Indigo application, and an exporter for your preferred 3D modelling application.
The Indigo installer comes bundled with installers for the latest SketchUp, Blender, Cinema 4D and 3ds Max exporters. On running the Indigo installer, it will attempt to auto-detect which of these packages you have installed and launch the installers for the corresponding exporter modules.
The latest stable release of Indigo and the exporter modules can be downloaded from http://www.indigorenderer.com/download.
We also regularly provide beta versions, generally with good stability, on our News and Announcements forum. These are recommended for confident users, or if you experience any problems in an older release.
Exporters
It is strongly recommended that you install the main Indigo application before installing any exporters, so that they can find the existing Indigo installation and link to it automatically. (This is normally done for you by the Indigo installer since version 3.2.)
It's possible to have a mismatch between the installed Indigo version and the exporter version; this can result in Indigo displaying an error message about unknown data in the scene file. In this case updating to the latest versions of both will generally resolve the issue.
For more information about the various Indigo exporters, please consult the corresponding manual or our Exporters forum.
Installing Indigo
To download Indigo, go to http://www.indigorenderer.com/download/ and select the appropriate version of Indigo for your platform (Windows, Macintosh or Linux). You should download the latest available version of Indigo, which will be listed at the top of the page.
System Requirements
Indigo will run on most modern computers (generally Pentium 4 or newer).
Please see the final section for GPU acceleration requirements and suggestions.
Minimum system specifications:
Windows:
- 64-bit x86 CPU with SSE4
- 4GB of RAM
- 150MB of hard drive space
- Windows 7 or newer
Mac:
- 64-bit x86 CPU with SSE4
- 4GB of RAM
- 150MB of hard drive space
- OS X 10.8 Mountain Lion or newer
Linux:
- 64-bit x86 CPU with SSE4
- 4GB of RAM
- 150MB of hard drive space
Recommended system specifications:
- 16GB+ of RAM
GPU acceleration
Required:
- Either an NVIDIA GPU supporting OpenCL 1.1 (GeForce 9800 GT or newer), or an AMD GPU supporting OpenCL 1.1 (Radeon 4xxx or newer)
- 256MB or 512MB of onboard GPU memory, depending on OS (more info)
- 2GB of system memory
Recommended:
- Either NVIDIA GeForce GTX 5xx / Quadro 4000 / Tesla C2050 or newer, or AMD Radeon 5xxx / FirePro 3D V3800 / FireStream 9350 or newer
- Quad-core or greater Intel or AMD CPU
GPU memory requirements
We recommend 512MB instead of 256MB as the minimum on Mac OS and Windows Vista/7 using the Aero desktop, since it uses more GPU memory for desktop window management.
If you are using an older GPU with relatively modest specifications, we encourage you to try the trial version before purchasing.
Indigo for Windows
Downloading and installing
Download the newest version of Indigo for Windows, then double click the installer file.
-
Agree to the licence
You will be presented with the Indigo End User Licence Agreement. You should read through it and click "I Agree" if you agree with the terms.
-
Choose components
We recommend you leave the check-boxes selected but you are able to disable each component if you have particular requirements on your system. Press Next to continue.
-
Choose an installation location
We recommend you use the default installation location, as most Indigo exporters will expect to find Indigo here – however you are able to change this path if you need to. Indigo will write a registry key that exporters will use to find Indigo automatically if Indigo is installed in a non-standard location. Press "Install" to complete the installation.
After installation
Once the installation has completed, you can find Indigo from the start menu under the "Indigo Renderer" or "Indigo RT" sub-menu, along with links to this manual and other program shortcuts for convenience.
Indigo for Macintosh
- Download the newest version of Indigo for Macintosh then double click the disk image mount it.
- A dialog will pop up, prompting you to drag the Indigo icon to your Applications directory:

- Drag the Indigo icon to the Applications directory.
- Indigo is now ready to be used on your Mac.
Indigo for Linux
- Download the latest Indigo for Linux from http://www.indigorenderer.com/download
- Extract the archive that you downloaded, for example with the command:
tar -xzvf IndigoRenderer_x64_v3.4.18.tar.gz
This will extract the archive into the directory dist/IndigoRenderer_x64_v3.4.18
- Indigo is statically linked as far as possible and should be ready for use. Run ./indigoconsole -v to see if Indigo installed correctly, for example:
cd IndigoRenderer_x64_v3.4.18/
./indigo_console -v
Which should print out something like
Indigo Renderer v3.4.18, Linux 64-bit build.
To run the graphical user interface, run ./indigo.
You are now ready to run Indigo.
Indigo Licensing
You are welcome to learn Indigo and use it for non-commercial renders without paying for a licence. The following restrictions are present in the free version of Indigo:
- Maximum resolution of 1.0 Megapixels – e.g. 1000 pixels by 1000 pixels.
- An Indigo logo is placed in the bottom right of the image.
- May not be used for commercial work.
- No customer support beyond that given in the Forum.
If you need to create renders at higher resolutions or produce renders as part of your business, then you need to buy a commercial licence for Indigo. You can buy licences online at:
http://store.glaretechnologies.com/
Once you have purchased a licence, you can instantly enable the full features of Indigo. Your licence will be locked to the hardware of your computer, and you must contact support@indigorenderer.com if you need to move the licence to another computer.
The licence for your computer is based on the CPU model of your processor and MAC address of your network card. You should avoid changing your network card regularly when using Indigo – for example avoid enabling and disabling your network card, as this may confuse the licensing software that Indigo uses.
If you wish to purchase multiple licences, you can use the network floating licence feature, managed by the Network Manager. To purchase these licences please contact us at sales@indigorenderer.com
There are two different kinds of Indigo licences:
- GUI Licence – for use on your desktop computer
- Node Licence – for use on networked render slaves
Having a GUI Licence does not mean that you can use unlicensed render slaves to generate a high resolution image, you will need a node licence for each computer that will be used to help you render your image.
If you have any problem with your Indigo licence, you can always contact us at support@indigorenderer.com and we'll get you up and running as soon as possible!
Indigo Licence Activation
Once you have purchased an Indigo Licence from the Glare Technologies Store you need to go through a few steps to activate it with Indigo.
- Open Indigo and click on the Licensing button.
- Press Copy to Clipboard to copy the hardware key. Do not copy the text manually.
- Upon purchase of a licence, you will receive an email with a link to the store page with your details on it. Keep this link somewhere secure, and check that your details are correct.
- Scroll down to the bottom section. Paste in your hardware key into the appropriate box, depending on the type of licence you own, and press "Generate Licence Key".
- A bunch of characters will be returned in a text box, copy it all.
- Paste it back into the Indigo Licence dialog box at the bottom, and press "Verify licence key".
- The Indigo background will also tell you if it is verified.

.png)
.png)
.png)
.png)
.png)
Success!

Floating Licence Activation
Getting the server Hardware ID
First, decide which computer you will use as a licence server.
Install Indigo Renderer (which can be downloaded from http://www.indigorenderer.com/download) on your server.
Run the "Indigo Network Manager" on the server.
(For example, on Windows, this can be accessed Start -> All Programs -> Indigo Renderer -> Indigo Network Manager)
Press the Licensing button, then "Copy to Clipboard" to copy the hardware ID for the server.
Email the hardware ID to support@indigorenderer.com
If you have purchased floating licences, we will reply with the licence file based on the hardware ID and the number of licences purchased.
Using the Licence Key
Once you have received your licence key by email, open up the Licensing dialog in the Indigo Network Manager again. Then paste the licence key into the text field labelled "Enter your licence key".
Finally, press "Verify licence key" and of the licence key is valid, the "licence status" field will display a message similar to the following:
Licensed to 'Nick Chapman'

Email: 'nick@indigorenderer.com'

5 x Network Floating Full
If the licence key is not valid, an error message will be displayed instead in the licence status field; please contact support@indigorenderer.com for assistance.
Using the Floating Licences
Obtain the Licence server's hostname
A hostname is a name used to identify a device connected to a computer network.
See the Network Rendering tutorial, step 3, for more information on this.
Make sure the Indigo Network Manager is running on the licence server, and the licence key is loaded into it as described earlier.
Set up Indigo on your workstation(s)
On your workstation computers, install Indigo Renderer.
Start Indigo Renderer.
- Click on the "Options" tool-bar button.
- Select the "Network" tab in the options dialog.
- Ensure that the "Use network manager" option is checked.
- In the "Network manager hostname" field, enter the licence server hostname.
- Ensure that the "Use floating licence" option is checked.
- Ensure that the "Do master search broadcast" option is unchecked.
- Click "OK" to save the changes and exit the options dialog.
Test retrieval of the floating licence
Restart Indigo on your workstation.
When Indigo starts, the Indigo logo and some information will be displayed in the main window.
If the floating licence retrieval was successful, the Licence type will be 'Network Floating Full' and
the Licensed to will be 'Network Floating Licence User', as shown:

Troubleshooting
Network ports
Some ports will need to be opened on the licence server, so that Indigo running on the workstations can connect to it: TCP Port 7200.
Network manager logging
The Indigo Network manager writes out reasonable comprehensive logs to network_manager_log.txt in the appdata directory, for example C:\Users\nick\AppData\Roaming\Indigo Renderer\network_manager_log.txt.
Looking at this log can give useful information if floating licences are not working.
Upgrading from Indigo 3 to Indigo 4
To upgrade your Indigo 3 licence to an Indigo 4 licence, follow these steps:
When you purchased an Indigo 3 licence, you will have received an email from billing@indigorenderer.com, which contains a link to your private licence page on store.glaretechnologies.com.
If you can't find the email, please contact support@indigorenderer.com for assistance.
Please follow this link to go to your licence page.
Then click on the "Buy Now" button in the "Upgrade to Indigo 4" section.

Upon clicking the "Buy Now" button, you will be taken to an order summary page for your upgrade order, which will summarise the cost and allow you to select the payment method to complete the order.
Upgrading from Indigo RT to Indigo Renderer
To upgrade your Indigo RT licence to an Indigo Renderer (Full) licence, follow these steps:
When you purchased an Indigo RT licence, you will have received an email from billing@indigorenderer.com, which contains a link to your private licence page on store.glaretechnologies.com.
If you can't find the email, please contact support@indigorenderer.com for assistance.
Please follow this link to go to your licence page.
Then click on the "Buy Now" button in the "Upgrade to Indigo 4" section.

Upon clicking the "Buy Now" button, you will be taken to an order summary page for your upgrade order, which will summarise the cost and allow you to select the payment method to complete the order.
Online Licensing
Online licensing allows you to use your Indigo licence on any computer connected to the internet.
You can only use a single licence on one computer at a time however.
Online licensing is new in Indigo 4.4.
To use Online licensing
Make an account
Go to https://store.glaretechnologies.com/ and make an account with the 'Signup' link on the top right of the page.
Link your Indigo order to your account
Once you have done that, you will need to go to your individual order page, the link to which was sent to you when you purchased an Indigo licence.
The link will look something like https://store.glaretechnologies.com/orders/xxxxxxxxxx
On your order page, click the 'Link order to your account' link.

You should see a message like "Succesfully claimed order #12345".
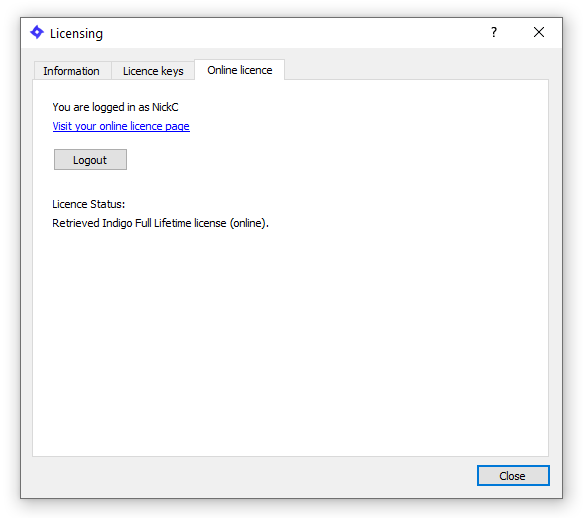
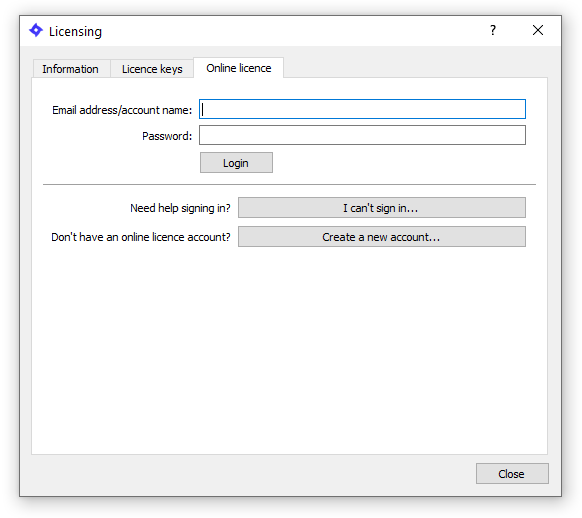
Log in from Indigo
Assuming you have a new enough Indigo build (version 4.4), run Indigo, then select the menu command
Help > Licensing
select the 'Online licence' tab, and enter your username and password you used to create your account on the store page.
After that it should automatically fetch the needed licence from our server, which will take a few seconds.
If your Indigo licence was fetched successfully, a message should be shown: