
The Indigo for Revit Render Settings control how Indigo renders your scene.
Here is an example screenshot of the render settings window:
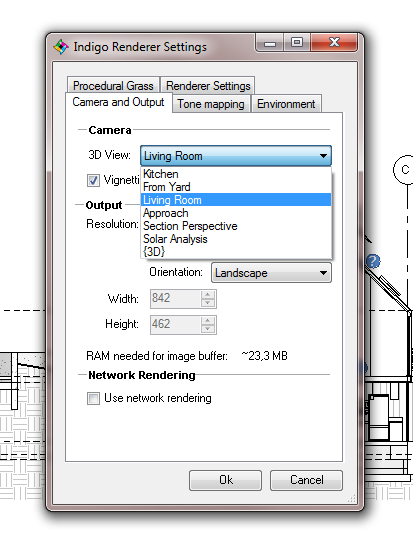
The Camera and Output tab contains options to select which 3D view to render from and the rendered image dimensions. Higher image resolutions will generally take longer and use more memory to render.
The Use network rendering option is useful for automatically starting network renders on export, which use the Indigo Network Manager to handle distributed rendering.
Tone mapping determines how the huge brightness range of real physical scenes gets compressed into the limited range displayable on computer screens; it is worth experimenting with these to get the best result for the particular scene being rendered.
The Environment tab contains options for the lighting environment; this can be either entirely background lighting (via physical sun and sky, or an HDR environment map), or optionally include the illumination from other light sources in the scene.
The Procedural Grass tab allows you to easily add fully 3D grass to your scenes, simply by choosing the material(s) on which grass should be scattered. The drop-down combo box lists the materials in the scene, which can be added to the list of grass scattering materials via the Add button; for example, adding the Grass material with the default settings produces a nice lawn in almost any scene. The view culling option is useful to only create grass in direct view of the camera, which speeds up the scene building before rendering; the grass density (in number of instances per square metre) can also be tweaked.
The Renderer Settings tab contains more advanced options such as options for Metropolis Light Transport. This is an advanced method for computing illumination that enables faster rendering of complex scenes, however it is not recommended for simpler scenes.