Indigo for Blender

Old Room by Oren–Nayar
Blendigo on Windows Tutorial
This tutorial will cover getting Indigo running with Blendigo on your computer. We will use the Blendigo exporter for Blender, that is used to export scenes to Indigo.
This tutorial is for Windows users.
If you have not purchased an Indigo licence, you can still follow this tutorial. Indigo will run in trial mode, which will apply some watermarks to Indigo renders.
Step 1: Install Blender 2.58 or newer
If you already have Blender 2.58 or newer, you can skip this step.
Download and install Blender 2.58 or newer from here: http://www.blender.org/download/get-blender/
Step 2: Download Indigo Renderer
The latest version of Indigo Renderer can be downloaded from this page: http://www.indigorenderer.com/download-indigo-renderer
If you have a 32-bit operating system, or you are not sure, download Indigo Renderer for Windows 32-bit.
If you have a 64-bit operating system, download Indigo Renderer for Windows 64-bit.
Step 3: Install Indigo Renderer
Once you have downloaded the Indigo installer program in step 2, run the installer program.
If the installer asks you 'Do you want to allow the following program to make changes to this computer,' select 'Yes.' Please carefully read the licence agreement, then click 'I Agree.'
On the 'Choose Components' page, make sure that the 'Blender exporter' is selected (otherwise Blender must be reinstalled), and press 'Next >'

On the 'Choose Install Location' page, leave the Destination Folder as it is, and press 'Install.'
After the Indigo installer has completed, the Blendigo installer will launch. It should autodetect where Blender is installed (otherwise Blender must be manually located, or reinstalled):

Press 'Finish'. Indigo will open after installation; close it for now, since we'll be using it via Blendigo.
Step 4: Enable plugin in Blender
Select 'User Preferences' in the editor type selector:

Then select the 'Render' category:

Then make sure the check-box on the right of the 'Render: Blendigo' box is ticked:

Select 'Info' in the editor type selector:

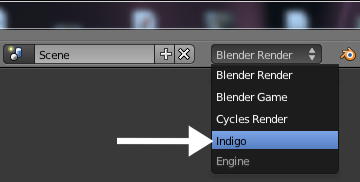
Now set the render engine to Indigo:

You should now be able to render scenes with Indigo by pressing F12.
Installation
-
Getting the latest version of Blendigo
The Indigo installer comes bundled with the latest version of Blendigo, however it can also be downloaded stand-alone from our Blender sub-forum, where it will be near the top of the top of the listed topics.
If you choose to use the stand-alone Blendigo installer, please note that you will still need to have the latest version of Indigo installed. For this reason we suggest using the Indigo installer to install Blendigo.
-
Ensuring the correct version of Blender is installed
Upon running the Blendigo installer, either from the main Indigo installer or the stand-alone installer, it will report the required version of Blender in the title, for example "Blendigo 3.6.25 for Blender 2.69".
If this version is not installed, install the appropriate version of Blender from http://www.blender.org before continuing.
-
Completing the installation
After you've verified that you have the appropriate version of Blender installed, allow the Indigo or Blendigo stand-alone installers to complete. If you're using the Indigo installer, ensure that the Blender exporter option was selected and installed.
As mentioned above, you must have Indigo installed in addition to the Blendigo exporter in order to render with Indigo from Blender. More detailed instruction for installing Indigo can be found here.
If the installer reports that it cannot find Blender on your system, either point it to your custom installation location, or follow the instructions from Step 1 again and ensure you install to the default locations. If you encounter further issues, please email us at support@indigorender.com.
-
Configuring Blender to use the Blendigo add-on
Open Blender, and from the File menu select "User Preferences". We want to enable the Blendigo add-on, so we select the "Render" filter from the list on the left near the bottom. Click the checkbox next to the "Render: Blendigo" option; it should become highlighted.
The dialog should look similar to this:
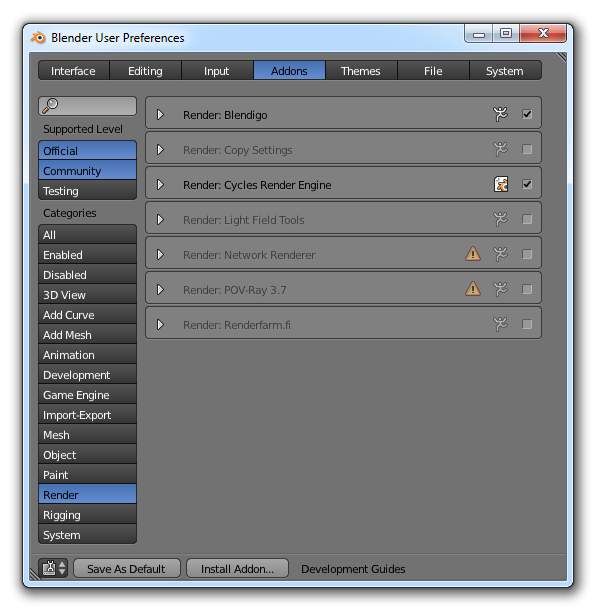
Click "Save As Default" so you won't have to do this every time you'd like to use Indigo as a renderer for Blender.
-
Setting the correct path to Indigo installation
You will need to make sure that the correct path to the Indigo executable is set in Blendigo:
You can find it here (Make sure Indigo is selected as the current render engine first - see next section)

On Windows, the path should be to the directory that the Indigo executable is in.
On OS X, the path should end with "Indigo.app", not "Indigo.app/Contents/MacOS/".
-
Exporting a simple test scene
First we must set the current renderer to "Indigo" from the drop-down box at the top of the Blender window (the default being "Blender Render"):
If no lights are present in the scene, as is the case by default, then Blendigo will automatically add a Sun lamp to the scene.
Press F12 to initiate the export and render process, launching Indigo.
Interface
Blendigo's functionality is tightly integrated into Blender, so the Indigo camera settings are located in the normal Blender camera options, the Indigo material settings are located in the normal Blender material options, etc.
For the most part these Indigo settings correspond exactly to those documented in the corresponding manual section.
Camera Settings
The settings in this section correspond exactly to the normal Indigo camera settings, which should be referred to for more information about the various options.
Environment Settings
The settings in this section correspond exactly to the normal Indigo environment settings, which should be referred to for more information about the various options.
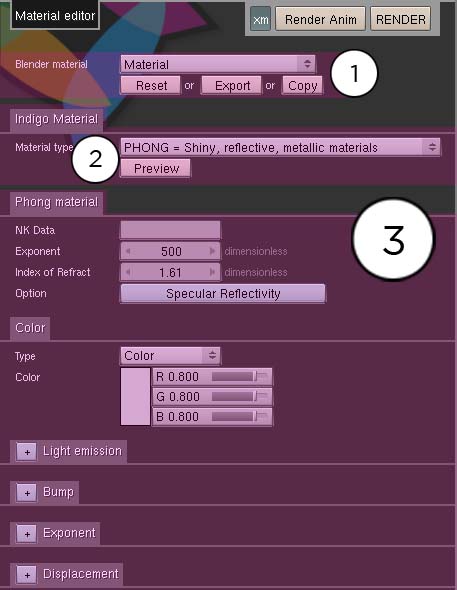
Material Editor
The materials setting page is used to configure the materials in the scene.
Blendigo will try and convert your Blender materials to Indigo materials as far as possible – but you are recommend to use Blendigo's material editor for more accuracy and control of your Indigo materials.
-
Blender material
This is the name of the blender material you are editing. When you select a new object, the objects material will be selected in Blendigo – so just right click on an object in your scene to select it in Blendigo.
Reset Reset to the original Blender material Export Export to an Indigo Material file (.IGM). Copy Copies the currently set Indigo material so you can copy it to another Blender material. -
Indigo Material
See Material Types
-
Material Channels
Mesh Subdivision
To use it you need to have blendigo open, then select a mesh in your scene and enable subdivision. Indigo subdivision works the same as the subsurf modifier available in Blender. It can be useful to use Indigo's built in subdivision because the models in Blender can have a low polygon count that are faster to work with – yet you still get a high quality render.
Subdivision in Indigo can also helpful for getting smooth results on objects that have displacement mapping.
See Mesh Subdivision
Render Settings
Renderer settings are for controlling the inner workings of Indigo. Most Indigo users will not have to modify from the default Blendigo settings.
System Settings
System settings are for controlling the Indigo application. Most Indigo users will never have to modify from the default Blendigo settings.
Tone mapping
Tone mapping is the process whereby the high dynamic range (HDR) image internally stored by Indigo is converted to a low dynamic range (LDR) image for display on a normal computer screen.
The settings in this section correspond exactly to the normal Indigo tone mapping settings, which should be referred to for more information about the various options.
Tutorials
Section Planes Tutorial
This tutorial applies to Indigo Renderer only.
This is a short tutorial explaining the use of section planes with Indigo for Blender.
Requirements
You will need to have Indigo for Blender (Blendigo) 3.4.9.1 or newer installed, as well as Blender and Indigo.
Steps
Step 1
Start with an empty blender scene, then add a Suzanne mesh and a sun lamp.

Step 2
Now we will add an object that represents the section plane.
We will use a plane for this.
So add the object by using the 'Add' -> 'Mesh' -> 'Plane' command.
Position the object so that it intersects the Suzanne mesh. This is just so we can see exactly how the Suzanne mesh will be affected.

Everything below this plane will be removed or be made invisible.
We want to remove stuff above the plane, so rotate the plane by 180 degrees in the y axis.
Step 3
Now select the plane object, then enable the section plane tickbox. This will make the plane object into
a section plane.

Step 4
Now render the scene. It should look like this:

Because 'Cull Geometry' was ticked (the 'Cull Geometry' tickbox is located beneath the 'Section Plane' tickbox), everything above the section plane was removed. This allows light from the sun and sky model to illuminate the interior of the Suzanne model.
If 'Cull Geometry' is unticked, then the top half of the Suzanne model is still there, it's just invisible to the camera. This means that it blocks light from the sun and sky, resulting in a black interior:
